Ви не увійшли.
- Теми: Активні | Без відповіді
Сторінки 1
#1 Re: Програмування Arduino » Arduino mega + e32 433t20d LoRa modul » 2023-10-20 14:43:25
Андр. пише:А ось коли натискаю кнопку то збивається передача даних
Спробуйте натискати цю ж кнопку, але в програмі опитувати якусь іншу, так відокремите - апаратна чи програмна проблема.
З цім розібрався, кнопки працюють все правильно, діло не в них. Тепер у мене інша проблема. Я передаю значення з ардуіно-1 на ардуіно-2 і все ОК, я зчитую данні з джойстика який стоїть на ардуіно-1. А ось я хочу налаштувати зворотній зв'язок, і тут проблема, не знаю чому перешукав багато туторіалів та коду і у мене не виходить відправити "ОК" з ардуіно-2 на ардуіно-1 коли кнопка натиснута. При цьому коли я відправляю sendMessage з ардуіно-2 то зависає передача в Serial port-у і приходиться його закрити і знов відкрити тоді все ок данні передавати відновлюються а ось меседж так і не приходить на ардуіно-1.
ось код нижче, може хтось з цим стикався та знає як вирішити?
#include <SPI.h>
#include <LoRa.h>
#include <Wire.h>

const int csPin = 52;          // LoRa radio chip select
const int resetPin = 3;       // LoRa radio reset
const int irqPin = 2;         // change for your board; must be a hardware interrupt pin

byte msgCount = 0;            // count of outgoing messages
byte localAddress = 0xBB;     // address of this device
byte destination = 0xFF;      // destination to send to
long lastSendTime = 0;        // last send time
int interval = 50;          // interval between sends

boolean flag1 = false;

int RLY1=2;

int Sensor1 = 0;

int relay1Status;

String outgoing;              // outgoing message

String statusmessage = "";

void setup() {
  Serial.begin(9600);                   // initialize serial

  //LoRa.setPins(csPin, resetPin, irqPin);// set CS, reset, IRQ pin

 pinMode(RLY1,OUTPUT);

  Serial.println("LoRa Duplex");

  if (!LoRa.begin(433E6)) {             // initialize ratio at 915 MHz
    Serial.println("LoRa init failed. Check your connections.");
    while (true);                       // if failed, do nothing
  }

  Serial.println("LoRa init succeeded.");
}

void loop() {

  if (millis() - lastSendTime > interval) {
    relay1Status = digitalRead(RLY1);
    lastSendTime = millis();            // timestamp the message
    interval = random(50) + 100;    // 2-3 seconds
  }

  onReceive(LoRa.parsePacket());

  //LoRa.receive();
}

void sendMessage(String outgoing) {
  LoRa.beginPacket();                   // start packet
  LoRa.write(destination);              // add destination address
  LoRa.write(localAddress);             // add sender address
  LoRa.write(msgCount);                 // add message ID
  LoRa.write(outgoing.length());        // add payload length
  LoRa.print(outgoing);                 // add payload
  LoRa.endPacket();                     // finish packet and send it
  msgCount++;                           // increment message ID
}

void onReceive(int packetSize) {
  if (packetSize == 0) return;          // if there's no packet, return

  // read packet header bytes:
  int recipient = LoRa.read();          // recipient address
  byte sender = LoRa.read();            // sender address
  byte incomingMsgId = LoRa.read();     // incoming msg ID
  byte incomingLength = LoRa.read();    // incoming msg length

  String incoming = "";

  while (LoRa.available()) {
    incoming += (char)LoRa.read();
  }

  if (incomingLength != incoming.length()) {   // check length for error
   // Serial.println("error: message length does not match length");
   ;
    return;                             // skip rest of function
  }

  // if the recipient isn't this device or broadcast,
  if (recipient != localAddress && recipient != 0xFF) {
    //Serial.println("This message is not for me.");
    ;
    return;                             // skip rest of function
  }

  // if message is for this device, or broadcast, print details:
 // Serial.println("Received from: 0x" + String(sender, HEX));
 // Serial.println("Sent to: 0x" + String(recipient, HEX));
  //Serial.println("Message ID: " + String(incomingMsgId));
 // Serial.println("Message length: " + String(incomingLength));
  Serial.println("Message: " + incoming);
  //Serial.println("RSSI: " + String(LoRa.packetRssi()));
  //Serial.println("Snr: " + String(LoRa.packetSnr()));
 // Serial.println();


String q = getValue(incoming, ',', 0);

Sensor1 = q.toInt();

//Serial.println(Sensor1);

if((Sensor1 == 1)&&(flag1==false))
{

  digitalWrite(RLY1,HIGH);
   relay1Status = 1;
  Serial.println("Relay 1 is turned on");
  flag1=true;
}

if((Sensor1 == 0)&&(flag1 ==true))
{

  digitalWrite(RLY1,LOW);
  relay1Status = 0;
  Serial.println("Relay 1 is turned off");
  statusmessage = statusmessage + relay1Status;
  sendMessage(statusmessage);
  delay(1000);
  flag1=false;
}

incoming = "";

  //statusmessage = statusmessage + relay1Status + "," + relay2Status + "," + relay3Status + "," + relay4Status;
  //sendMessage(statusmessage);
}
String getValue(String data, char separator, int index)
{
    int found = 0;
    int strIndex[] = { 0, -1 };
    int maxIndex = data.length() - 1;

    for (int i = 0; i <= maxIndex && found <= index; i++) {
        if (data.charAt(i) == separator || i == maxIndex) {
            found++;
            strIndex[0] = strIndex[1] + 1;
            strIndex[1] = (i == maxIndex) ? i+1 : i;
        }
    }
    return found > index ? data.substring(strIndex[0], strIndex[1]) : "";
}#2 Програмування Arduino » Arduino mega + e32 433t20d LoRa modul » 2023-10-10 11:55:52
- Андр.
- відповідей: 2
Доброго всім дня! Потрібна допомога. Є дві плати ардуіно мега і два радіо модуля e32 433t20d LoRa. Передаю через них структуру даних. На платі ардуіно Send стоїть два джойстика та клавіатура і екран я передаю на плату Receive дані положення джойстиків і значення клавіатури та двох кнопок. Коли ні чого не роблю то все приходить норм без проблем. Як що змінюю положення джойстика то значення змінюються. А ось коли натискаю кнопку то збивається передача даних і не коректно показує дані потім і значення зміщаються. Прикладаю код двох плат та те що відбувається в порту. Може хтось може допомогти в цьому?
Send arduino (що посилає значення)
#include <Wire.h>
#include <Keypad.h>
#include <LiquidCrystal.h>
#include <SoftwareSerial.h>

LiquidCrystal lcd(12, 11, 5, 4, 3, 2);

#include "EBYTE.h"

#define PIN_RX 9
#define PIN_TX 8
#define PIN_M0 7
#define PIN_M1 6
#define PIN_AX 10

#define pinX_1    A0
#define pinY_1    A1
#define swPin_1   30

#define pinX_2    A2
#define pinY_2    A3
#define swPin_2   31

int buttonState = LOW;
int lastButtonState = LOW;

struct DATA {

  char Key;
  int X1_send;
  int Y1_send;
  int X2_send;
  int Y2_send;
  int swPin1_send;
  int swPin2_send;

};
int Chan;
DATA MyData;

SoftwareSerial ESerial(PIN_RX, PIN_TX);

const byte ROWS = 4;
const byte COLS = 4;

char hexaKeys[ROWS][COLS] = {

  {'D','C','B','A'},
  {'#','9','6','3'},
  {'0','8','5','2'},
  {'*','7','4','1'}
};
byte rowPins[ROWS] = {25, 24, 23, 22};
byte colPins[COLS] = {29, 28, 27, 26};

Keypad customKeypad = Keypad( makeKeymap(hexaKeys), rowPins, colPins, ROWS, COLS);

EBYTE Transceiver(&ESerial, PIN_M0, PIN_M1, PIN_AX);

void setup(){

 lcd.begin(16, 2);

 Serial.begin(9600);

 ESerial.begin(9600);

 Transceiver.init();

 pinMode(pinX_1, INPUT);
 pinMode(pinY_1, INPUT);
 pinMode(swPin_1, INPUT_PULLUP);
 pinMode(pinX_2, INPUT);
 pinMode(pinY_2, INPUT);
 pinMode(swPin_2, INPUT_PULLUP);


 lcd.setCursor(2, 0);
 lcd.print("Browning");
 lcd.setCursor(4, 1);
 lcd.print("Ver.:1.1");

 lcd.clear();

  //Transceiver.PrintParameters();
}

void loop(){

  Keypad_mod();

  analog_joy();

  Send_message();

  Transceiver.SendStruct(&MyData, sizeof(MyData));

}

void Keypad_mod(){

  char customKey = customKeypad.getKey();

  if (customKey){
    MyData.Key = customKey;
    lcd.begin(16, 2);
    lcd.setCursor(0, 0);
    lcd.print(customKey);
    //lcd.print("  ");
    //Serial.println(customKey);
  }
  //Serial.print("Key: "); Serial.print(MyData.Key);
}
void analog_joy(){

  int X1 = analogRead(pinX_1);              // считываем значение оси Х
  int Y1 = analogRead(pinY_1);
  int X2 = analogRead(pinX_2);              // считываем значение оси Х
  int Y2 = analogRead(pinY_2);

  int X1_Analog = map(X1, 516, 1023, 0, 100);
  int Y1_Analog = map(Y1, 510, 1023, 0, 100);

  int X2_Analog = map(X2, 510, 1023, 0, 100);
  int Y2_Analog = map(Y2, 510, 1023, 0, 100);

  int State_swPin1 = digitalRead(swPin_1);
  int State_swPin2 = digitalRead(swPin_2);

  lcd.setCursor(0, 0);
  lcd.print("X1:");
  lcd.setCursor(3, 0);
  lcd.print(X1_Analog);
  lcd.print("   ");

  lcd.setCursor(0, 1);
  lcd.print("Y1:");
  lcd.setCursor(3, 1);
  lcd.print(Y1_Analog);
  lcd.print("  ");

  lcd.setCursor(7, 0);
  lcd.print("X2:");
  lcd.setCursor(10, 0);
  lcd.print(X2_Analog);
  lcd.print("  ");

  lcd.setCursor(7, 1);
  lcd.print("Y2:");
  lcd.setCursor(10, 1);
  lcd.print(Y2_Analog);
  lcd.print("  ");

  lcd.setCursor(13, 0);
  lcd.print("B:");
  lcd.setCursor(15, 0);
  lcd.print(State_swPin1);
  lcd.print("  ");

  lcd.setCursor(13, 1);
  lcd.print("B:");
  lcd.setCursor(15, 1);
  lcd.print(State_swPin2);
  lcd.print("  ");
  //Serial.println(Y2);

}
void Send_message(){

  int X1 = analogRead(pinX_1);              // считываем значение оси Х
  int Y1 = analogRead(pinY_1);
  int X2 = analogRead(pinX_2);              // считываем значение оси Х
  int Y2 = analogRead(pinY_2);

  int State_swPin1 = digitalRead(swPin_1);
  int State_swPin2 = digitalRead(swPin_2);

  MyData.X1_send = analogRead(pinX_1);
  MyData.Y1_send = analogRead(pinY_1);
  MyData.X2_send = analogRead(pinX_2);
  MyData.Y2_send = analogRead(pinY_2);

  MyData.swPin1_send = digitalRead(swPin_1);
  MyData.swPin2_send = digitalRead(swPin_2);

   /* //Serial.print("Key: "); Serial.print(MyData.Key);
    Serial.print("  X1: "); Serial.print(MyData.X1_send);
    Serial.print("  Y1: "); Serial.print(MyData.Y1_send);
    Serial.print("  X2: "); Serial.print(MyData.X2_send);
    Serial.print("  Y2: "); Serial.print(MyData.Y2_send);
    Serial.print("  swPin1_send: "); Serial.print(MyData.swPin1_send);
    Serial.print("  swPin2_send: "); Serial.println(MyData.swPin2_send);   */

}
Receive Arduino (що приймає значення)
#include <AccelStepper.h>
#include <SoftwareSerial.h>
#include "EBYTE.h"

const int stepPin = 9;
const int directionPin = 8;
const int enablePin = 7;

const int SPEED = 1000;

const int setSPEED = 1000;

#define PIN_RX 53
#define PIN_TX 52
#define PIN_M0 51
#define PIN_M1 50
#define PIN_AX 48

// i recommend putting this code in a .h file and including it
// from both the receiver and sender modules
struct DATA {

  char Key;
  int X1_send;
  int Y1_send;
  int X2_send;
  int Y2_send;
  int swPin1_send;
  int swPin2_send;

};
int Chan;
DATA MyData;
unsigned long Last;

// connect to any digital pin to connect to the serial port
// don't use pin 01 and 1 as they are reserved for USB communications
SoftwareSerial ESerial(PIN_RX, PIN_TX);

// create the transceiver object, passing in the serial and pins
EBYTE Transceiver(&ESerial, PIN_M0, PIN_M1, PIN_AX);

AccelStepper stepper(AccelStepper::DRIVER, stepPin, directionPin);

void setup() {

  Serial.begin(9600);

  stepper.setEnablePin(enablePin);
  stepper.enableOutputs();
  stepper.setMaxSpeed(SPEED);
  //stepper.setAcceleration(1000);
  stepper.setSpeed(SPEED);

  ESerial.begin(9600);

  Transceiver.init();

}

void loop() {

    Read_arduinoMega();
    X1_left_rigth_state();
    //MoveConerLeft ();
    MoveConerRigth ();

}

void X1_left_rigth_state(){

  int X1_left_rigth;

  X1_left_rigth = map(MyData.X1_send, 516, 1023, 0, 100);

  //Serial.println(X1_left_rigth);

  if (X1_left_rigth >= 20){
      stepper.setSpeed(setSPEED);
      stepper.runSpeed();
    }else if(X1_left_rigth <= -20){
      stepper.setSpeed(-setSPEED);
      stepper.runSpeed();
    }else {
          stepper.setSpeed(0);
          stepper.stop();
    }

   //Serial.println(MyData.swPin2_send);
}
void MoveConerLeft (){

    int ButtonStateConer = MyData.swPin1_send;

    if (ButtonStateConer == LOW){
      int setSPEED = 3000;
      stepper.setSpeed(setSPEED);
      stepper.setAcceleration(3000);
      stepper.runToNewPosition(1000);
      stepper.run();
      //Serial.println(ButtonStateConer);

    }
    else if (ButtonStateConer == HIGH){
        stepper.setCurrentPosition(0);
        stepper.setSpeed(0);
        //Serial.println(ButtonStateConer);
    }
    //stepper.run();

}
void MoveConerRigth (){

    //int ButtonStateConer2 = MyData.swPin2_send;

    if (MyData.swPin2_send == 0){
      int setSPEED = 3000;
      stepper.setSpeed(-setSPEED);
      stepper.setAcceleration(3000);
      stepper.runToNewPosition(-1000);
      stepper.run();
      //Serial.println(ButtonStateConer2);

    }
    else if (MyData.swPin2_send == 1){
        stepper.setCurrentPosition(0);
        stepper.setSpeed(0);
        //Serial.println(ButtonStateConer2);
    }
  //Serial.println(MyData.Key);

}


void Read_arduinoMega(){

  if (ESerial.available()) {

    Transceiver.GetStruct(&MyData, sizeof(MyData));
  //ESerial.readBytes((uint8_t*)& MyData, (uint8_t) sizeof(MyData));

    Serial.print("Key: "); Serial.print(MyData.Key);
    Serial.print("  X1: "); Serial.print(MyData.X1_send);
    Serial.print("  Y1: "); Serial.print(MyData.Y1_send);
    Serial.print("  X2: "); Serial.print(MyData.X2_send);
    Serial.print("  Y2: "); Serial.print(MyData.Y2_send);
    Serial.print("  swPin1_send: "); Serial.print(MyData.swPin1_send);
    Serial.print("  swPin2_send: "); Serial.println(MyData.swPin2_send);


    Last = millis();

  }
  else {

    if ((millis() - Last) > 300) {
      //Serial.println("Searching: ");
      Last = millis();
    }

  }
}
і ось що приходить в Serial port:
Key: #  X1: 520  Y1: 510  X2: 506  Y2: 509  swPin1_send: 1  swPin2_send: 1
Key: #  X1: 519  Y1: 511  X2: 506  Y2: 509  swPin1_send: 1  swPin2_send: 0  // натиснув кнопку
Key: #  X1: 520  Y1: 511  X2: 505  Y2: 510  swPin1_send: 1  swPin2_send: 1
Key: #  X1: 519  Y1: 511  X2: 506  Y2: 509  swPin1_send: 1  swPin2_send: 1
Key: #  X1: 519  Y1: 511  X2: 506  Y2: 509  swPin1_send: 1  swPin2_send: 1
Key: #  X1: 520  Y1: 511  X2: 506  Y2: 510  swPin1_send: 1  swPin2_send: 1
Key: #  X1: 520  Y1: 510  X2: 505  Y2: 510  swPin1_send: 1  swPin2_send: 1827 // і потім щось пішло не так
Key:   X1: 511  Y1: 505  X2: 509  Y2: 1  swPin1_send: 1  swPin2_send: 2083
Key:   X1: 511  Y1: 506  X2: 510  Y2: 1  swPin1_send: 1  swPin2_send: 2083
Key:   X1: 511  Y1: 505  X2: 510  Y2: 1  swPin1_send: 1  swPin2_send: 2083
Key:   X1: 511  Y1: 506  X2: 509  Y2: 1  swPin1_send: 1  swPin2_send: 2083
Key:   X1: 511  Y1: 505  X2: 509  Y2: 1  swPin1_send: 1  swPin2_send: 2083
Key:   X1: 511  Y1: 506  X2: 510  Y2: 1  swPin1_send: 1  swPin2_send: 1827
Як можна вирішити це питання? Щось з struct DATA, а як вирішити це поки не розумію.
#3 Re: Проекти » Arduino для музикантів » 2023-04-14 14:44:22
В часи, коли ще не знав про мікроконтролери, користувався програмкою під лінукс xoscope, сигнал вона отримує з аудіовходу PC/ноутбука, а щоб зробити високоімпедансний вхід "социлографа", використав операційний підсилювач. Якщо цікаво, можу знайти цю плату і викласти схему. З цією ж платою використовував програмку baudline, вона малює спектральну інтенсивність сигнулу в часі, для музикантів може бути цікавою.
Так цікаво, цікаво було б глянути.
#4 Re: Проекти » Arduino для музикантів » 2023-04-14 11:58:16
Зібрав міні осцилограф на платі Arduino Nano
https://www.youtube.com/watch?v=jCp75MIvQ7g
Можна провіряти сигнал
#5 Апаратні питання » USB Host Shield 2.0 -Stepper motor та Thrustmaster USB Joystick » 2022-09-30 16:31:41
- Андр.
- відповідей: 0
Всім привіт потрібна допомога, не можу розібратись з кодом
Є Arduino Mega та USB Host Shield 2.0 я підключив джойстик (Thrustmaster USB Joystick)
залив скетч з рідної бібліотеки USB Host Shield 2.0 (USBHIDJoystick)
За допомогою джойстика хочу керувати шаговим двигуном (підключений через драйвер).
Проблема полягає в тому що коли я переміщаю ручку джойстика в ліва або в право то двигун працює тільки коли змінюються положення джойстика, коли значення не змінні то двигун не рухається, але значення змінились
Без USB Host Shield 2.0 двигун працює, я назначив на кнопки на клавіатурі, але коли підключив USB Host Shield 2.0 то дуже повільно по кроково і стоїть на місці.
USBHIDJoystick
#include <usbhid.h>
#include <hiduniversal.h>
#include <usbhub.h>

// Satisfy IDE, which only needs to see the include statment in the ino.
#ifdef dobogusinclude
#include <spi4teensy3.h>
#endif
#include <SPI.h>

#include "hidjoystickrptparser.h"

USB Usb;
USBHub Hub(&Usb);
HIDUniversal Hid(&Usb);
JoystickEvents JoyEvents;
JoystickReportParser Joy(&JoyEvents);

void setup() {
        Serial.begin(19200);

#if !defined(__MIPSEL__)
        while (!Serial); // Wait for serial port to connect - used on Leonardo, Teensy and other boards with built-in USB CDC serial connection
#endif
        Serial.println("Start");

        if (Usb.Init() == -1)
                Serial.println("OSC did not start.");

        delay(200);

        if (!Hid.SetReportParser(0, &Joy))
                ErrorMessage<uint8_t > (PSTR("SetReportParser"), 1);
}

void loop() {

        Usb.Task();

}
hidjoystickrptparser.cpp
#include "hidjoystickrptparser.h"

#include <AccelStepper.h>

const int PUL = 7;
const int DIR = 6;
const int ENA = 5;

const int SPEED = 6400;

const int setSPEED = 2000;

AccelStepper stepper(AccelStepper::DRIVER, PUL, DIR);

JoystickReportParser::JoystickReportParser(JoystickEvents *evt) :
joyEvents(evt),
oldHat(0xDE),
oldButtons(0) {
        for (uint8_t i = 0; i < RPT_GEMEPAD_LEN; i++)
                oldPad[i] = 0xD;
}

void JoystickReportParser::Parse(USBHID *hid, bool is_rpt_id, uint8_t len, uint8_t *buf) {
        bool match = true;

        // Checking if there are changes in report since the method was last called
        for (uint8_t i = 0; i < RPT_GEMEPAD_LEN; i++)
                if (buf[i] != oldPad[i]) {
                        match = false;
                        break;
                }

        // Calling Game Pad event handler
        if (!match && joyEvents) {
                joyEvents->OnGamePadChanged((const GamePadEventData*)buf);

                for (uint8_t i = 0; i < RPT_GEMEPAD_LEN; i++)oldPad[i] = buf[i];
        }

        uint8_t hat = (buf[5] & 0xF);

        // Calling Hat Switch event handler
        if (hat != oldHat && joyEvents) {
                joyEvents->OnHatSwitch(hat);
                oldHat = hat;
        }

        uint16_t buttons = (0x0000 | buf[6]);
        buttons <<= 4;
        buttons |= (buf[5] >> 4);
        uint16_t changes = (buttons ^ oldButtons);

        // Calling Button Event Handler for every button changed
        if (changes) {
                for (uint8_t i = 0; i < 0x0C; i++) {
                        uint16_t mask = (0x0001 << i);

                        if (((mask & changes) > 0) && joyEvents) {
                                if ((buttons & mask) > 0)
                                        joyEvents->OnButtonDn(i + 1);
                                else
                                        joyEvents->OnButtonUp(i + 1);
                        }
                }
                oldButtons = buttons;
        }
}

void JoystickEvents::OnGamePadChanged(const GamePadEventData *evt) {

        stepper.setEnablePin(ENA);
        stepper.enableOutputs();
        stepper.setMaxSpeed(SPEED);
        stepper.setAcceleration(1500);

        uint8_t X1 = evt->X;
        uint8_t Y1 = evt->Y;
        int setSPEED;


        if((X1 >= 128)&&(X1 <= 251)){
            setSPEED = map(X1, 251, 128, -5, -500);
            stepper.setSpeed(setSPEED);
        }
        if((X1 >= 4)&&(X1 <= 127)){
            setSPEED = map(X1, 4, 127, 5, 500);
            stepper.setSpeed(setSPEED);
        }
        if((X1 > 251)||(X1 < 4)){
            setSPEED = 0;
            stepper.setSpeed(setSPEED);
        }


        /*Serial.print("tY1: ");
        Serial.print(evt->Y, DEC);
        Serial.print("tX2: ");
        Serial.print(evt->Z1, DEC);
        Serial.print("tY2: ");
        Serial.print(evt->Z2, DEC);
        Serial.print("tRz: ");
        Serial.print(evt->Rz, DEC);
        Serial.println("");
        */
        stepper.runSpeed();
        }

void JoystickEvents::OnHatSwitch(uint8_t hat) {
        Serial.print("Hat Switch: ");
        PrintHex<uint8_t > (hat, 0x80);
        Serial.println("");
}

void JoystickEvents::OnButtonUp(uint8_t but_id) {
        Serial.print("Up: ");
        Serial.println(but_id, DEC);
}

void JoystickEvents::OnButtonDn(uint8_t but_id) {
        Serial.print("Dn: ");
        Serial.println(but_id, DEC);
}
hidjoystickrptparser.h
#if !defined(__HIDJOYSTICKRPTPARSER_H__)
#define __HIDJOYSTICKRPTPARSER_H__

#include <usbhid.h>

struct GamePadEventData {

        uint8_t X, Y, Z1, Z2, Rz;
};

class JoystickEvents {
public:
        virtual void OnGamePadChanged(const GamePadEventData *evt);
        virtual void OnHatSwitch(uint8_t hat);
        virtual void OnButtonUp(uint8_t but_id);
        virtual void OnButtonDn(uint8_t but_id);
};

#define RPT_GEMEPAD_LEN		5

class JoystickReportParser : public HIDReportParser {
        JoystickEvents *joyEvents;

        uint8_t oldPad[RPT_GEMEPAD_LEN];
        uint8_t oldHat;
        uint16_t oldButtons;

public:
        JoystickReportParser(JoystickEvents *evt);

        virtual void Parse(USBHID *hid, bool is_rpt_id, uint8_t len, uint8_t *buf);
};

#endif // __HIDJOYSTICKRPTPARSER_H__
Знайшов на Arduino.cc форумі таку ж саму тему, але відповіді там не знайшов.
https://forum.arduino.cc/t/controlling- … ick/649874
Може хтось може мені допомогти в цьому питанні, або підскажіть де копати))
#6 Re: Різне » Обмін, продаж, то що... » 2022-08-17 12:59:20
Є в наявності 10 плат Arduino Nano Every (Original) обміняю на 10 плат Arduino Nano v3.0 (original or copy)
#7 Re: Проекти » Arduino для музикантів » 2022-08-17 12:54:37
Ось глянь сюди що зібрав ще, трохі цікавих девайсів))
Може буде комусь цікаво
Синт на ардуіно нано
#8 Re: Проекти » Arduino для музикантів » 2021-02-24 16:11:55
Всім привіт зібрав ще таку штуку, що скажете, можна грати свої ритми
Драм машина на микроконтроллері Atmega328
DIY Drum Machine (The Bleep Drum) ? своими руками
#9 Re: Проекти » Arduino для музикантів » 2020-11-29 12:49:23
Всім привіт!
Новій девайс зібрав на DIY Метроном
Як вам? Що скажете?
Нічого складного
#10 Re: Проекти » Arduino для музикантів » 2020-06-05 18:28:03
Зібрав таку річ Сенсорний синтезатор
Як вам? Що скажете?
Можна грати самому, можна підключити до модульного синтезатора.
#11 Re: Проекти » Arduino для музикантів » 2020-01-20 15:27:08
Зробив ось такий фразовий семплер
Фразовый сэмплер ? ( модуль записи на микросхеме 1820)
Як вам?
Запис до 10 сек.
Запис фрази або муз треку та в живу змінювати його
#12 Re: Проекти » Arduino для музикантів » 2019-12-09 15:56:13
Привіт всім зібра таку штуку)) на модулі mpr121
Arduino fruit Piano ? (на основі mpr121) прошив в Midi
Як вам?
можна на фруктах грати свою музику))
#13 Re: Проекти » Arduino для музикантів » 2019-09-10 12:10:16
#14 Re: Проекти » Arduino для музикантів » 2019-07-03 14:57:56
#15 Re: Проекти » Arduino для музикантів » 2019-05-17 23:34:29
ось що вийшло, зробив собі міді контролер
#16 Re: Різне » Обмін, продаж, то що... » 2017-11-26 10:20:55
Так может сразу и цену пиши.
модуль Wifi ESP8266 ESP-12E з монтажною платою - 80 грн
#17 Re: Проекти » Arduino для музикантів » 2017-11-26 10:12:14
по юсби у вас всё работает как вам нужно ?
так по юсб працює все гууд, але хочетеся щоб було без юсб на відстані, через скетч firmata arduino радіомодуль не працює NRF24L01, я ще не розібрався. Як зробити по без юсб?
#18 Re: Проекти » Arduino для музикантів » 2017-11-24 15:20:15
Знайшли простіше рішеня
? Ага, попробуйте, наскільки воно простіше
. А головне дуже здивуєтесь радіусом дії
Ну якщо ви в цьому розбираєтесь то допоможіть як зробити бездротово, бо тільки вийшло скласти пульт по кабелю юсб
#19 Re: Проекти » Arduino для музикантів » 2017-11-18 12:06:03
от вашего басиста лего-коробочка развалится, а уж если врубит барабанщик...))))
)))) ми спокійно будемо грати, тільки двое в групі поки що...
#20 Різне » Обмін, продаж, то що... » 2017-11-18 11:57:23
- Андр.
- відповідей: 29
Пропоную в цій темі писати кому що потрібно, продати або обміняти між користувачами цього форума.
Продам модуль Wifi ESP8266 ESP-12E з монтажною платою.
або обміняю на два радіо модулі NRF24L01. вислати можу новою поштою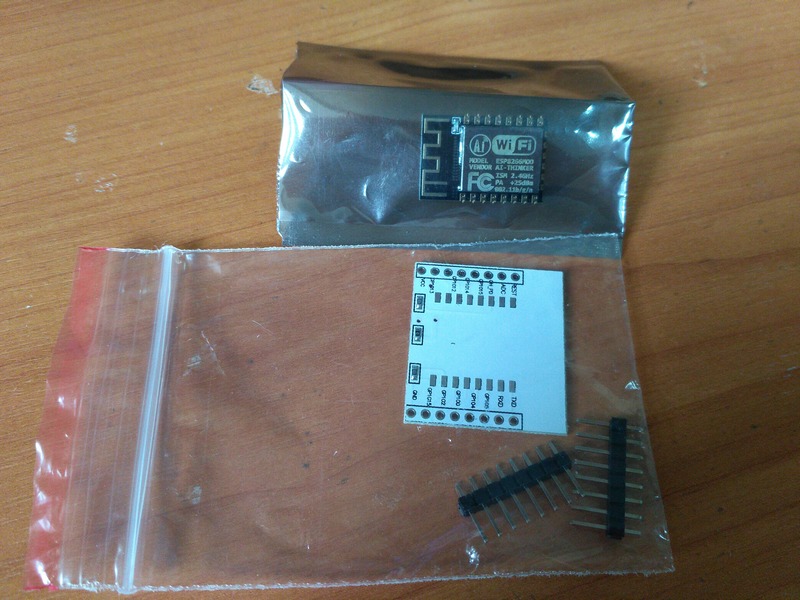
#21 Re: Проекти » Arduino для музикантів » 2017-11-18 11:44:15
вирішив не брати модуль esp8266 дуже складний в програмуванні та підключенні, вирішив взяти два радіо модулі NRF24L01, почав збирати пульт.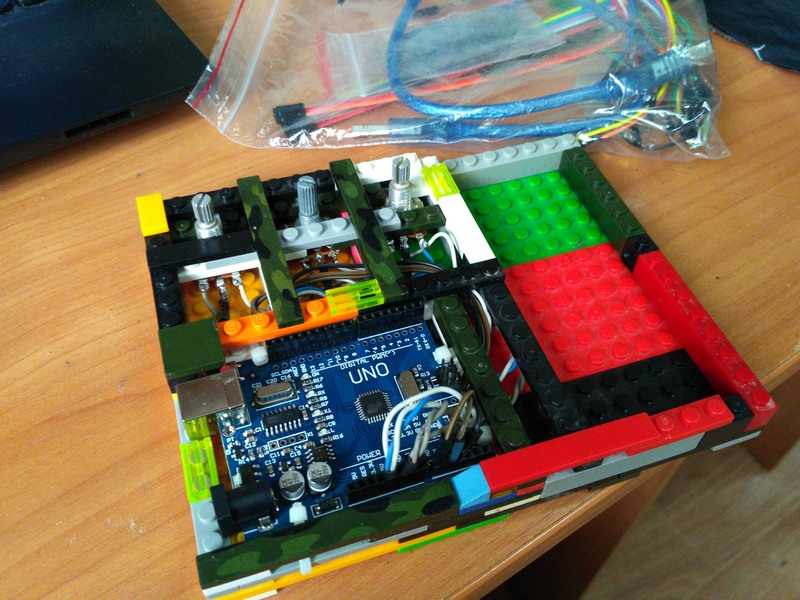
#22 Проекти » Arduino для музикантів » 2017-11-12 20:03:25
- Андр.
- відповідей: 23
Хочу зроби проект з Arduino та цієї програми VVVV https://vvvv.org
Проект для виступу рок гурту. Під час виступу через проектор візуалізувати різні ефекти, зміни кольору, фігур, відео, та інше.
Ось недавно зробив у програмі vvvv такий патч на малюнку.
Можливо зробити так щоб через модуль esp8266 по wifi я міг управляти програмою? Зробити типу пульт керування і зі сцени управляти ним)))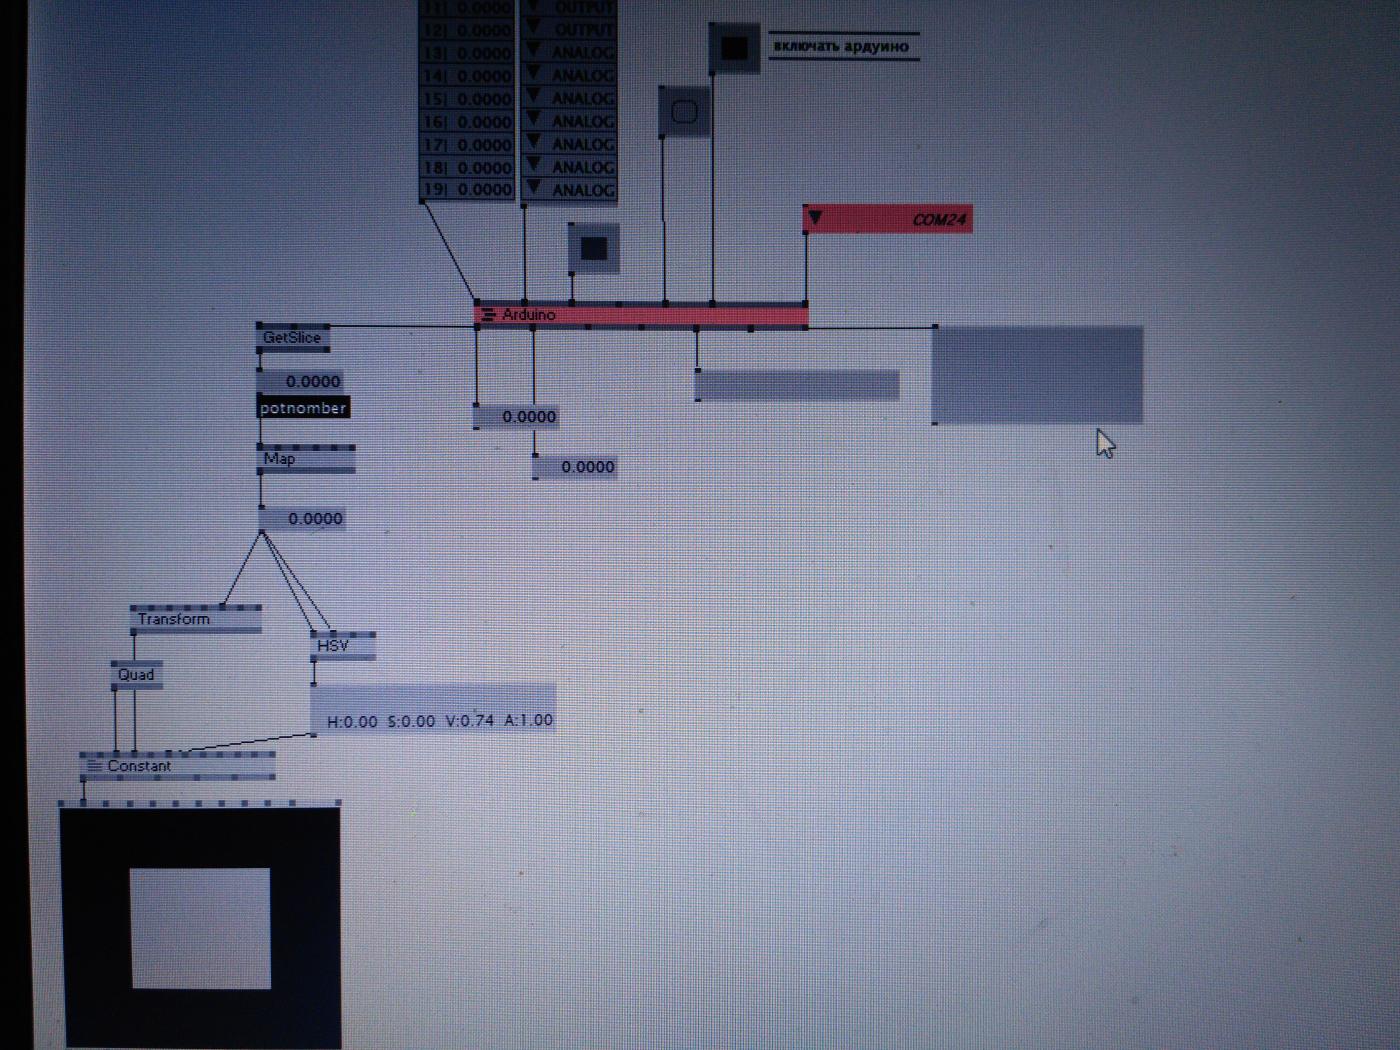
Сторінки 1